WELCOME!!

Thank you so much for taking the time to look at my blog! You really do not understand how much I appreciate it. If you have any questions/suggestions/or if you just want to say hi, PLEASE send me an email!! My email address is tmc089@hotmail.com and I LOVE getting emails, especially bloggy-related ones :D!

Tuesday, April 28, 2009

FINALLY!! Almost everything you need to know about mascara.


After promising for weeks, finally a little blurb about mascara!!

I would say anyone who wears makeup should absolutley wear mascara. It's easily my #1 beauty item. As said by "Getting Gorgeous" by Instyle, "Lush, darkened lashes not only exude femininity, but also brighten and enlarge your eyes."


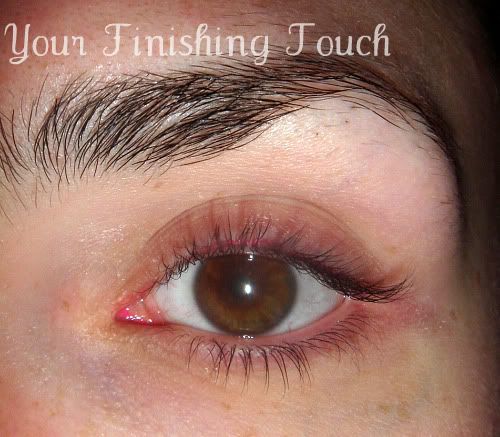
In order to find your perfect mascara, you have to identify your lashes. Everyone's eyelashes are different. Some are short, some are thick, some are light, etc. I personally have long and thin lashes, seen here.


So how do you know your type of lashes? It takes a lot of trial and error. I know my lashes are long because whenever I use a lengthening mascara, they pretty much touch my brow bone, which isn't attractive in my opinion! I also consider them thin because you can barely see the damn things when they're naked!!

So now that you know your type of lashes, how do you know which mascara you should get? Get a mascara that offers what you don't have. Since I have long, thin lashes, I usually always get a volume boosting/ thickening mascara since I want thick lashes.

Types of Mascaras
  • Lengthening: The wands come with lenghtening mascaras have short, densly packed bristles that allow you to get more mascara onto each lash with every swipe. The design also makes it easier to touch up tips - the most important area to coat if you're trying to achieve the appearance of longer lashes. Lengthening mascara contains plastic plymers that cling to lashes and extend byond the tips of your lashes to add precious millimeteres. My top lengthening mascara is L'oreal Double Extend Beauty Tubes Mascara. It's crazy.
  • Thickening: Mascaras that add volume have a thicker formula of waxes and silicone plymers that coat the lashes and bulk them up. They also contain darker, more intense pigment, which gives the illusion of denseness with just one or two layers. My favorite thickening mascara EVER is Maybelline Colossal Volum' Express.
  • Curling: These contain polymers that cause the mascara to contract once it's been applied, causing lashes to shrink and lift. "Fixing" plymers hold the curves in place. Curling formulas work particularly well on short lashes. A good example of this is Maybelline Sky High Curves.
  • Non-Smudging: Waterproof and water-resistant mascaras have special formulas that repel water and minimize smudging and running. The best ones are formulated to dissolve easily with oil-based makeup removers ot hey don't have to be scrubbed off. Waterproof mascara is best for swimmers and at the beach; water-risistant is easier to remove and therefore more appropriate for weddings and watching movies like Terms of Endearment. Use both types sparingly because they tend to dry out lashes. Try Lo'real Voluinous Waterproof.
  • Non-Clumping: Clump-free mascara keeps lashes from looking gloppy - t hanks to moisture-rich ingredients like silk exract and glycerin, which allow the product to glide on smoothly. Applicators with long bristles pull it evenly through your lahes. They contain fewer waxes and fibers than regular mascaras, so you won't get a lot of volume and length. The effect is more natural than va-va-voom. Maybelline Lash Discovery Waterproof is a good example.
A lot of the above is also from Getting Gorgeous by InStyle, it's a really good beauty reference book.

My absolute favorite mascara ever is Diorshow Iconic. It makes my lashes a tad longer, and adds beautiful beautiful volume. I love it. It's a bit pricey for $27 at Sephora, but I would pay that easily for this mascara. Some people have issues with it smudging, but I've had no problems with it. 


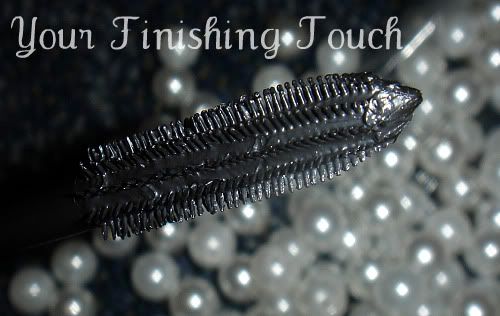
^That's a good close up of Diorshow's wand. It's beautiful lol. My absolute fave of all time. 

I don't use anything special to take off my eye-makeup. I use Oil-Free Eye Makeup Remover from Neutrogena, it's the one in the purple bottle. It's an oldie but a goodie.

If you have any questions, please feel free to comment and I hope I helped clear up those mascara issues!!

Thursday, April 23, 2009

Update!!

Hey everyonee!!

So it's been like 2 weeks since my last post...whoops! Haha thank you Gianna for kicking my ass to get on the blog bidness. School has been so ridiculous lately, and I'm pretty much over that whole scene. I'm sure you all know what I mean. 

Hmm let's see. A Rose Romance just came out, hopefully buying some shizz from there tonight, definitely getting Rose Fix+ because I love Fix+ with everything in my achey breakey heart!!

Future posts...I'm doing one on mascara and different formulas for Miss G, and yes I know I still need to do the GHD Review. It's hard to get good hair pictures haha. If anyone has requests or anything, please comment or email me! My email address is tmc089 at hotmail dot com. Do it up loves :)

BTW, going to see the delicious Dane Cook on Saturday. I am so pumped ahh!

Oh and to my new followers, welcome and thank you so much! Chit chat with you all later, hopefully tomorrowww!!!

Sunday, April 12, 2009

Happy Easter Everyone!!


Hello everyone in blog land!! Since it's Easter, I thought I'd hook you up with a little Peep Show...


BAHAHAHAHA!! I thought this was so funny when I saw it. Peep show. Hahahahaha.

ANYWAYS. For Easter Eric's mom got me some Coach lipglosses!! I don't have my camera cord at the moment, but expect a review and some swatches for them. I'm also going to do a little something something about mascara, and which ones are best for different types of eyelashes. So stay tuned...! Have a great day everyone!!

Tuesday, April 7, 2009

Face Contour/Highlighting Tutorial

Hey everyone!! The art of face contouring and highlighting is a mystery to most people. It may prove to be difficult at first, but it can make a world of a difference. I'll be using the book "Making Faces" by the late renowned makeup artist Kevyn Aucoin. It's a great book and I highly recommend it to anyone with a love of cosmetics.


"This photo is really an illustration of the contours of the face. The application is exaggerated and not to be taken too literally. It's just to show how highlighting and contouring (when sparingly applied and carefully blended) can add definition to the face. You can use this photo to understand your own bone structure and make the most of it. Practice at home in daylight and test your progress. You may n ever do this for everyday life, but for special occasions or photographs, it can really make a difference."

  • Dark colors shade and make areas recede, for instance the hollows of the cheek, temples, under the chin, sides of the nose.
  • Light colors highlight and make things come forward: the apples of the cheek, under the eye, the browbone and middle of the chin.
It's usually best to use a bronzer-type color to contour with LITTLE TO NO shimmer. Shimmery, lighter colors should be used for highlighting. Shimmer draws attention to that area, which defeats the purpose of contouring. 

FOR HIGHLIGHTING:
-the browbone
-center of the eyelid
-center of the forehead and down through the bridge of the nose
-the cheekbone plane and uner the eye (see illustration if you don't understand)
-around the corners of the mouth
-the collarbone
-the inside curve of the breast

FOR SHADING/CONTOURING:
-the hollows of the cheek
-under the chin and down the neck
-sides and under the tip of the nose
-into the crease of the eye
-the temples
-the center of your clevage
-the hollows above and below your collarbone
-around the hairline

*For shading into your cheekbones, it's best to used an angled contour brush.

I normally do minimal shading/highlighting. For more dramatic looks, I'll do more. For everyday I shade in under my cheekbones, my temples, and the creases of my eyes. I also highlight my cheekbones, collarbone, and center of my forehead. It adds a healthy glow/definition to an everyday look.

If you have any questions, please let me know!! All of the italicized text is directly from Kevyn's book, which has turned into somewhat of a bible for me! Have an awesome week everyone!!

Wednesday, April 1, 2009

Red Lip Tutorial


Ooooh two posts in one day!! You lucky readers.

Today I'll be doing a really really simple tutorial on a sexy red lip. This is great if you're doing a cute 40's look or even a Halloween idea (I know I'm a smidge early ;)) if you're going for the Marilyn look.
____________________________________________
Products Used:
Chapstick (OR MAC Prep + Prime. My lips dry out so easily and Prep + Prime dries them out a decent amount.) Just a base.
MAC Red Enriched Lipliner. Something the same color as the lipstick your using.
MAC Brave Red Lipstick. A really true red color.
MAC Monogram Posh Life Lipgloss. It's a bright pink/ reddish color to finish off the look.
____________________________________________
-So! Step one is to prep your lips. Just give them a nice smooth base that isn't too heavy. I just apply a thin layer of chapstick.


-Next is to line your lips. I start at the outside and color in the rest of my lip from there. Make sure everything is colored in really well, and that it's even. Clean up any mistakes that you make on the way. This will almost give your lips the "stained" look. It keeps the color more true and prevents it from getting all over your face like you got dunked in Kool Aid!!


-After that, time for lipstick. A lot of makeup artists will advise to use a lip brush. I personally don't care much for them. I always use the very tip of my lipstick and apply ALL OVER your lip. Lip brushes are recommended because a lot of people tend to mainly put lipstick in the center, ignoring the sides of your lips. Clean up your mistakes, smoosh, and blot once with a tissue. You can see the color getting more intense in the pics..


-The last step is to add some lipgloss!! Apply it all over the bottom lip area and smoosh together, cleaning up any mistakes. I keep saying that because mistakes are pretty noticeable with this color, lol. After applying gloss they'll look so smoking hot!!


YOU ARE DONE!! See? Red lips totally aren't hard!! I usually pair it with some bold black liner, you don't want to go overboard with shadows when you have such a bold color on the lips. Any questions? Let me know!! Have a great night everyone!


If anyone has any suggestions/ideas for ANYTHING, please email me at tmc089@hotmail.com
I'm always open to them while I'm still figuring out this whole blog/HTML thing!!

Blahh bored @ work!!

Oh heyyy. I just got into work and I'm SO SO tired. I need a day off from life just so I can sleep and bum around!! I still have to do a review on the GHD, and I'm also doing a red lip tutorial.
Apparently all the rage in blog world is posting vids lately! (cough cough Holly/Steph cough cough) it makes me want to jump on the bandwagon but I don't have a webcam and I don't know how long my camera will record for so...meh. We'll seeeee.
Biiiig big shout outs to my girls Jenn B. and Gianna!!! Lol I talked to both of them yesterday and they mentioned creeping on my blog...ahh I love it! And hello to my few new followers! Thanks soo much for looking everyoneee!