
Hey everyone!! The art of face contouring and highlighting is a mystery to most people. It may prove to be difficult at first, but it can make a world of a difference. I'll be using the book "Making Faces" by the late renowned makeup artist Kevyn Aucoin. It's a great book and I highly recommend it to anyone with a love of cosmetics.
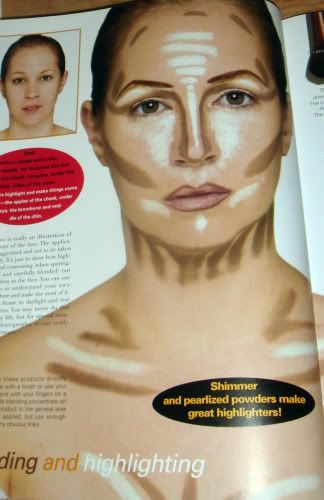
"This photo is really an illustration of the contours of the face. The application is exaggerated and not to be taken too literally. It's just to show how highlighting and contouring (when sparingly applied and carefully blended) can add definition to the face. You can use this photo to understand your own bone structure and make the most of it. Practice at home in daylight and test your progress. You may n ever do this for everyday life, but for special occasions or photographs, it can really make a difference."
- Dark colors shade and make areas recede, for instance the hollows of the cheek, temples, under the chin, sides of the nose.
- Light colors highlight and make things come forward: the apples of the cheek, under the eye, the browbone and middle of the chin.
It's usually best to use a bronzer-type color to contour with LITTLE TO NO shimmer. Shimmery, lighter colors should be used for highlighting. Shimmer draws attention to that area, which defeats the purpose of contouring.
FOR HIGHLIGHTING:
-the browbone
-center of the eyelid
-center of the forehead and down through the bridge of the nose
-the cheekbone plane and uner the eye (see illustration if you don't understand)
-around the corners of the mouth
-the collarbone
-the inside curve of the breast
FOR SHADING/CONTOURING:
-the hollows of the cheek
-under the chin and down the neck
-sides and under the tip of the nose
-into the crease of the eye
-the temples
-the center of your clevage
-the hollows above and below your collarbone
-around the hairline
*For shading into your cheekbones, it's best to used an angled contour brush.
I normally do minimal shading/highlighting. For more dramatic looks, I'll do more. For everyday I shade in under my cheekbones, my temples, and the creases of my eyes. I also highlight my cheekbones, collarbone, and center of my forehead. It adds a healthy glow/definition to an everyday look.
If you have any questions, please let me know!! All of the italicized text is directly from Kevyn's book, which has turned into somewhat of a bible for me! Have an awesome week everyone!!


No comments:
Post a Comment
Thanks for taking the time to look at my blog!! I really appreciate it :)